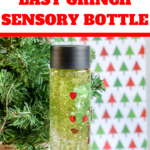
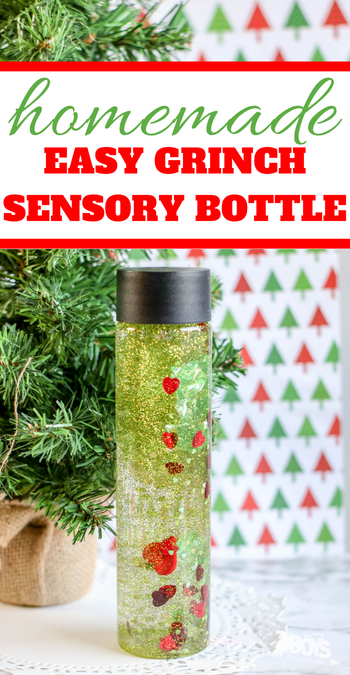
How to Make a Grinch Sensory Bottle
If you have a kiddo that loves the Grinch Who Stole Christmas, this Grinch Sensory Bottle is the perfect calm down bottle for sensory enrichment. This is just one of the many fun ideas that you’ll find in my Grinchmas Ideas and Activities!

Plus, this is a ridiculously fun “toy” to have around. I know it’s not a toy, but the kids think that it is and by having this available, you can easily convince them that using this tool as a toy, well, that’s just awesome.
How to Use This Grinch Sensory Bottle
Let’s talk specifically about this Grinch glitter bottle. Super simple and lots of fun, the kids will love playing with this. This could be a calm down activity, something to do in the car while driving to the store, or just a fun evening bedtime kids activity as they’re drifting off to sleep.
To add a learning layer to your sensory bottle you can have your child count the buttons, identify the different colors. Tell you the first letter of the objects or older children could even write the words for the items in the bottle.
The possibilities really are endless.
How to Make a Grinch Sensory Bottle
Pour one container of glue into the bottle.
Fill the empty glue container about halfway full with warm water (about ¼ cup) and replace the lid.
Shake the glue container well to mix the remaining glue with the water.
Pour the glue/water mixture into the sensory bottle, place the lid on the sensory bottle and shake to combine.
If you plan to add glitter or toys to the sensory bottle, add half of the glitter and/or toys into the bottle.
Seal the sensory bottle and shake well.
If the items do not move easily, add additional warm water. If the glitter or confetti moves too much, you can add more glue.
Keep adding more glitter/water/glue until you reach the consistency you want.
Seal the sensory bottle and hot glue the lid in place to avoid spills.
Enjoy!
You could even draw-on a Grinch face on the bottle for even more fun!
Would you like to save this?
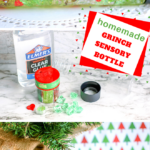
Specialty Supplies:
The following ingredients are affiliate links on Amazon because they may be a bit hard to find in your normal store. I wanted you to be able to see exactly which things we are using.
- Large heart button
- 1 (16 ounce) plastic storage/sensory bottle (you can use a mason jar, but this works better and is less likely to break if dropped)
- 2 to 3 (6 ounce) bottles Elmer’s Glue in clear
Reminder, not all supplies to make the Grinch Sensory Bottle are linked above, just the ones that may be a bit difficult to find or that you might be unsure of what to look for.
Must Have Resources:
When making a Grinch Sensory Bottle home, you really need to have the following Amazon affiliate tools on hand.
Best Grinch Ideas:
Once you make this Grinch Sensory Bottle, you’ll be in need of some additional Grinch-iness in your life for sure. I mean, who doesn’t love a mean one activity or treat or basically everything to do with the Grinch?! Good news for you, I have some of the best Grinch ideas ever, gathered right here.

More Sensory Activities:
If you’re just here for the awesome sensory ideas, you better bet that we have more sensory activities that your kid will love!
More DIY Grinch Craft Ideas:
- Grinch Puppet
- Pin the heart on the Grinch (party game)
- DIY Grinch hand ornament
- Easy gift boxes
- Grinch Bookmarks

How to Make a Grinch Sensory Bottle
Equipment
- Funnel
- Hot Glue Gun
Materials
- 1 16 ounce plastic storage/sensory bottle
- 2 to 3 6 ounce bottles Elmer’s Glue in clear
- About 1 cup warm water
- Large heart button
- Heart confetti
- Lime green glitter
- Green aquarium rocks
Instructions
- Pour one container of glue into the bottle.

- Fill the empty glue container about halfway full with warm water (about ¼ cup) and replace the lid.
- Shake the glue container well to mix the remaining glue with the water.
- Pour the glue/water mixture into the sensory bottle, place the lid on the sensory bottle and shake to combine.
- If you plan to add glitter or toys to the sensory bottle, add half of the glitter and/or toys into the bottle.

- Seal the sensory bottle and shake well. If the items do not move easily, add additional warm water. If the glitter or confetti moves too much, you can add more glue. Keep adding more glitter/water/glue until you reach the consistency you want.
- Seal the sensory bottle and hot glue the lid in place to avoid spills.

- Enjoy!