
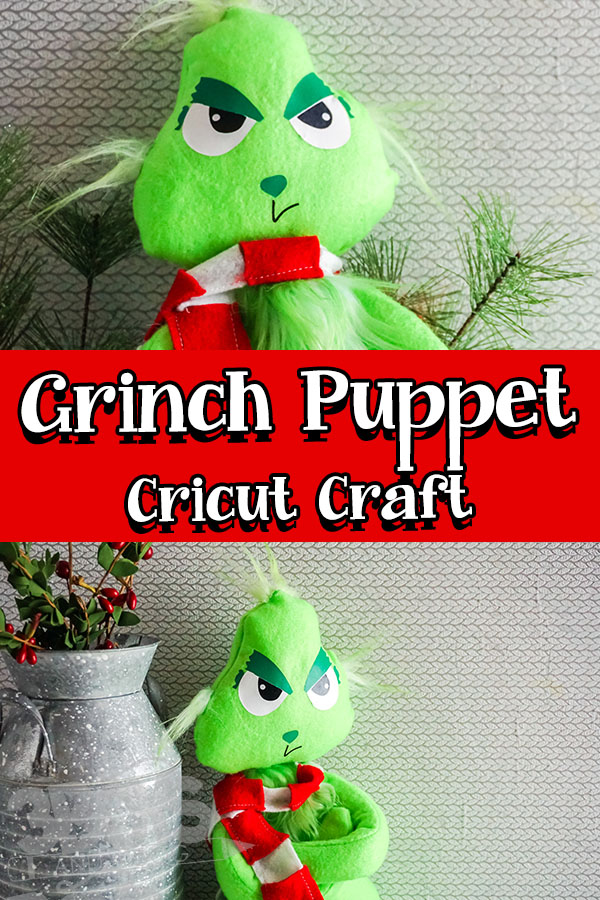
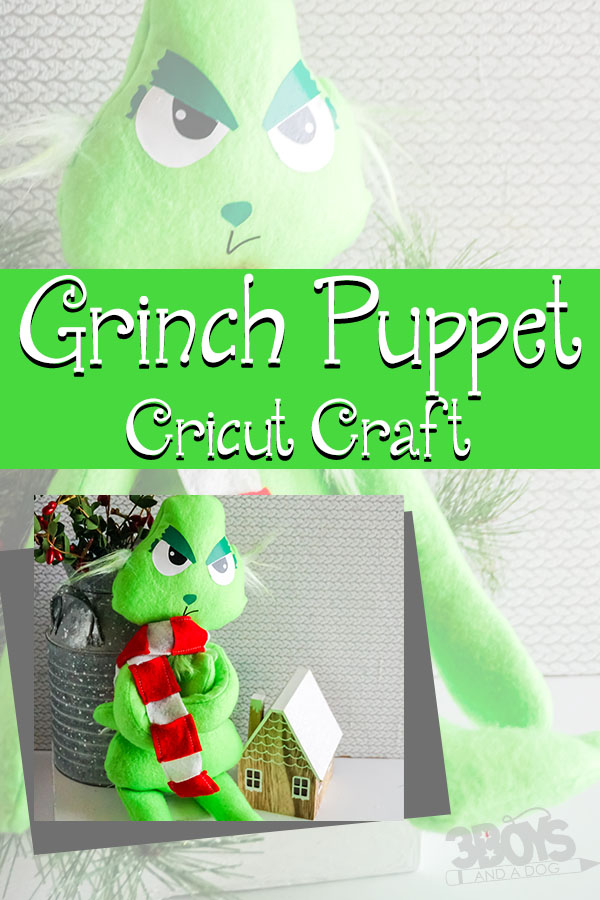
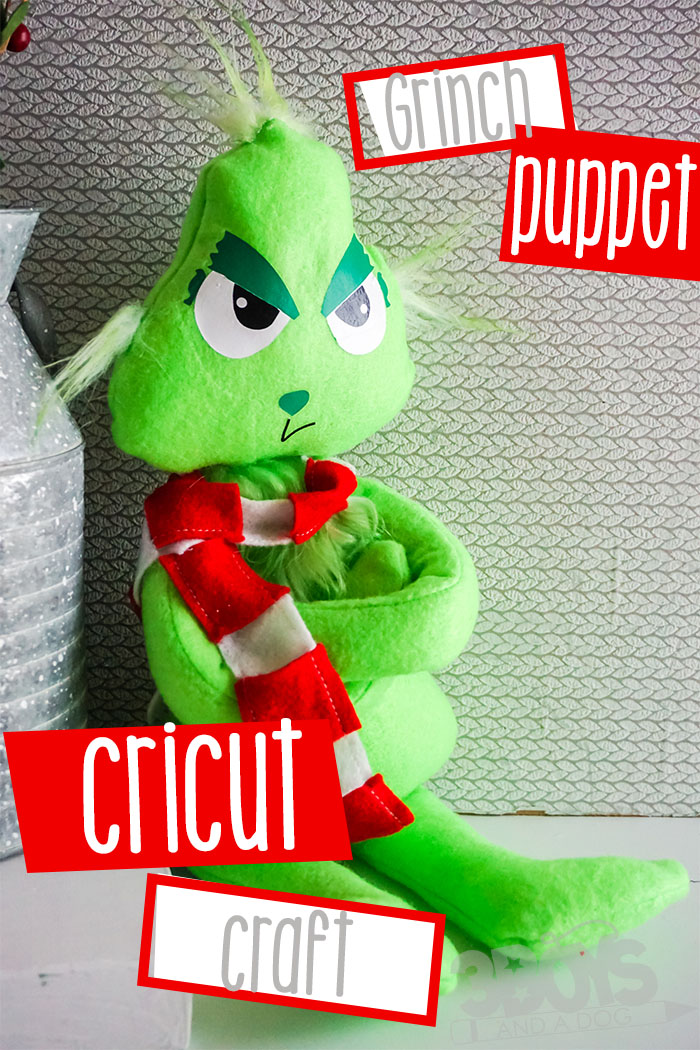
The Grinch Puppet Cricut Craft

If you have a little one with a Grinch obsession or you yourself plan to decorate with the Grinch this year for Christmas, this Grinch puppet is the best and quickest Grinch doll you can make! This is such a fun activity to add to all your awesome Grinchmas Ideas!
I’m super excited to be making this Grinch toy to go with the other decorations I’ve made from my list of 20+ Grinch crafts you’ll love. So much green fun, you’ll be sick of it!

Disclosure: I work with Cricut as a Brand Ambassador. This post also contains affiliate links.
The best part (and seriously what I’m OB-sessed with) about this easy to sew Grinch puppet is the grumpy little face. I just want to pinch those cheeks–and I can now. Because I have a Grinch doll now.
Grinch Puppet Cricut Craft
Be sure to check out my craft guide for more fun ideas to create!
Erhm, that went sideways fast. Aaaanyway, what I love most is that little face–and the fact that I was able to make this Grinch face from vinyl, it made me ridiculously happy.
No messing with doll eyes that don’t look right, weird bulging bits or anything else that makes the end result look any less cool.
Just a cute Grinch puppet SVG you can make an adorable Grinch doll with and not mess it up (because yes, that’s a possibility when I’m sewing).
Initially, I wanted to make a paper grinch, something you could include as a favor for a school Christmas party, holiday party or whatever, but then I got carried away. Perhaps a paper grinch doll will be next month’s activity…perhaps.
Until then, we’re going with this Grinch Who Stole Christmas stuffie then we’ll see what happens next month when it happens.


Its perfect for Dr. Seuss day or as a surprise gift for the kids under the Christmas tree. Literally, the kids are going to love this as much as you, hands down.
Let’s get to making a fun Grinch stuffie for a fun Grinch Cricut craft for Christmas!

Would you like to save this?
Necessary Materials:
To be honest, I used scraps of vinyl I had from some projects that were laying around, just waiting for their day in the sun. I have a lot of supplies that kind of roll around in the craft room that just never see their time–but this holiday season, I have some big plans for holiday crafts that are definitely “scrap busters” like this one!
If you want to see exactly what I used to make my grinch doll, I’ve linked them below.
- Green Heat Transfer Vinyl
- Black Heat Transfer Vinyl
- White Heat Transfer Vinyl
- Green Faux Fur
- Green Felt
Necessary Tools:
You can plug this Grinch doll SVG into any cutting machine software and make your little Grinchmas doll, but I used the cutting machine I had on hand. In case you’re still trying to figure out what works for you, here’s the tools I use in my craft room:
- Hot Glue Gun & Glue
- Sewing Machine
- Cricut EasyPress Mini
- Cricut Explore Air 2 or Cricut Maker
Tips and Tricks:
I’m not a super duper craft maker, but I do spend some time making stuff now and again–enough that I occasionally call one storage/guest bed/junk room a “craft room” once in a while. And with that bit of experience, I have a few tips that will help you make your Grinch doll without any missteps.
- To get a nice, clean finish on your vinyl, EITHER layer everything in the first press with your Cricut Easy Press Mini, OR let the first layer cool completely (about 4-5 minutes) before doing the second layer so that it won’t make the first layer overheat and bubble.
- Before you turn your pieces inside out to make your Grinch body and head, cut small slits in the hem at the curves or trim the excess fabric close to the hem line so that the fabric inside the doll doesn’t bunch up and make those curves look lumpy.
- If you want your Grinch to have shorter arms (meaning you don’t want him to cross his arms, which is why the arms are so long–I really wanted that grumpy arm crossing) then just trim the length before you sew the arms together. But don’t wait until after you sew them together unless you plan to re-sew the hem at the ends to make sure it won’t come undone.
More Grinch Resourcxes:
- Grinch Slice and Bake Cookies
- 25+ Grinchy Recipes Perfect for Grinchmas
- DIY Grinch Bookstack for Christmas
More DIY Grinch Craft Ideas:

The Grinch Puppet Cricut Craft
Equipment
- Hot Glue Gun & Glue
- Sewing Machine
- Cricut EasyPress Mini
- Cricut Explore Air 2 or Cricut Maker
- Rotary Blade
- Sewing Pins
Materials
- Free Grinch Doll Cut File
- Green Heat Transfer Vinyl
- Black Heat Transfer Vinyl
- White Heat Transfer Vinyl
- Green Faux Fur
- Green Felt
- Red Felt Scraps
- White Felt Scraps
- Green Thread
- White Thread
- Polyfill
Instructions
- Download the SVG File, then upload it to Cricut Design Space.
- Insert the image onto the next screen, then duplicate the leg and arm shapes to make 4 of each, duplicate the head and body shapes to make 2 each, then select "make it".
- For the felt elements, select acrylic felt as the material for the felt pieces and cut them, using the rotary blade.
- For the heat transfer vinyl elements, select heat transfer vinyl as the material, place the vinyl face-down on the mat, then cut them, using the fine point blade.
- When the cut is complete, weed the designs for each of the the Grinch elements.
- Carefully place the vinyl elements of the face onto one of the head shapes and, using the Easy Press Mini to press them in place. As mentioned above, either layer each of the layered eye elements in one press or allow each lower layer to fully cool before heat pressing on the next layer.
- Placing the two head pieces face-to face, pin around the exterior, leaving a 3-4 -inch long section open in the center of the neck. Sew the hem around the exterior of the head shapes. Turn the head shape right-side out and stuff full with polyfill.
- Pin together two of the arm shapes, sew the hem around the exterior, leaving the end open where it will attach to the body and turn right-side out. Stuff the arm with polyfill. Repeat with the second arm and the two legs.
- Pin the two body shapes together, sew the hem around the exterior, leaving a 3-inch section open in the center of the neck where it will attach to the body and turn right-side out. Stuff the body with polyfill.
- Fold the open sections of both the head and body neck openings inside the respective pieces, then hand stitch the head to the body.
- Fold the open end of each arm and each leg inside the respective piece, then hand stitch the arms and legs to the body where desired.
- Cut 3 small rectangles of green faux fur about 1 inch long by 1/2 inch wide. Hot glue one of these rectangles to the top of the Grinch’s head and one on each cheek.
- Cut a larger rectangle of green faux fur about 2 inches wide by 4-6 inches long (long enough to wrap around the neck) then hot glue it in place around the neck for his scruff.
- To make the scarf, cut your red and white rectangles of felt into sections (they don’t need to be perfect–this is supposed to look like a "raggedy" scarf). Pin the sections of red and white felt end-to-end, overlapping by about 1/8 inch, run a hem on each side, connecting all of the pieces. Loosely wrap this scarf around the Grinch’s neck and enjoy!
Isn’t this project just one of the most awesome holiday crafts for the Grinch?! If you’re loving this adorable Grinch Cricut craft, be sure to pin it to your favorite holiday crafts board on Pinterest so you can find it again quick when you’re ready to make another one!


