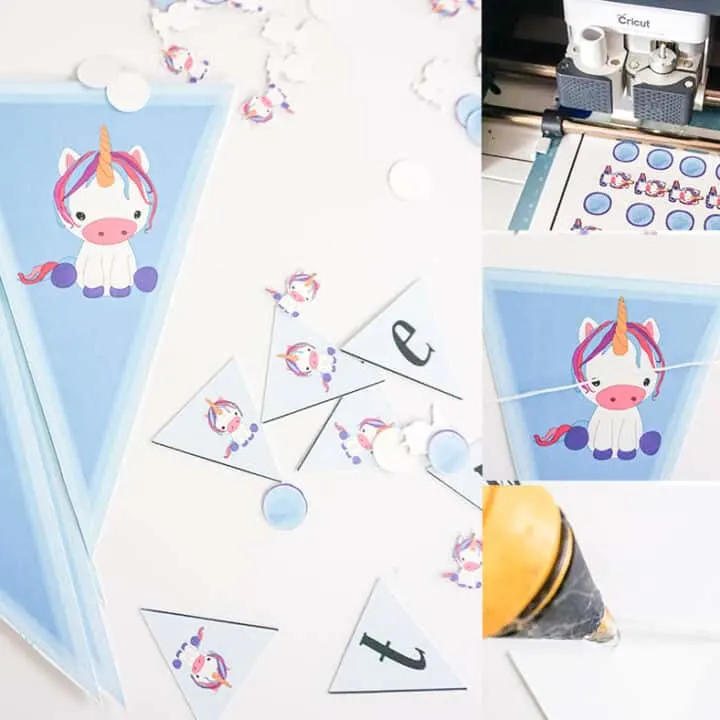
These easy unicorn baby shower decorations make pulling together a unicorn baby shower so simple and fun. Just print and cut on the Cricut and you’re ready to go!
If this is the first baby shower you’re planning or your fiftieth, I’ve got some tips for you for how to host a baby shower that will make your unicorn shower on point! (I cannot believe I just said that)

Disclosure: I work with Cricut as a Brand Ambassador. This post also contains affiliate links.
Back to these unicorn shower decoration ideas and their epic cuteness. I can just imagine so many fun things I can do with these, can’t you?!
And the very best part of this set of unicorn decorations for a baby shower is that they only took me 10 minutes to make. Even less time than it would have taken me to head to the party ideas store and pick something, then drive home.
Let’s start decorating!
Unicorn Baby Shower Decorations
Even if DIY-ing is not your thing and you’re just poking around trying to find some awesome unicorn shower decorations to buy, I’ve got you covered. Just check some of these out:
- Unicorn Balloon Arch and Garland Kit
- Adorable Stand-Up Unicorn Balloons
- Fun Unicorn Party Package
- Unicorn Party in a Box
Necessary Materials:
Even though the playing field is wide open and you can use basically anything to make your baby shower decorations, I thought you might like to know what I used to make mine:
- Quality White Card Stock Paper
- Twine or Ribbon
- Free Print-and-Cut Files (there are several of these, so scroll on down)
Necessary Tools:
Putting together this easy set of unicorn baby shower decorations was wickedly easy. Especially once I figured out the design. And that’s done for you, so you’re halfway there!
To get it done, I just used:
- Hot Glue Gun & Glue
- Cricut Explore Air 2 or Cricut Maker
- Desktop Printer

Tips and Tricks:
Basically, if you follow the tutorial below, you’re going to have a handful of awesome unicorn party decorations in hand. But what do you do with it all?! Well, I’ve got some ideas you’ve to explore:
- Use the big unicorn circles for unicorn cupcake toppers by just taping one on each side of a toothpick using double-stick tape.
- Tape the mini banner on the diaper cake, or use chopsticks to put it on top of a real cake for a little mini-cake banner (I love those).
- For someone even more extra than me, you can stuff the table scatter into the invitation envelopes like confetti (just shrink it down a bit smaller in Cricut Design Space). Too fun not to.
- Make a display of your party favors by tossing some of that table scatter into a basket with some of that crinkle tissue paper. It’s so fun.
Fun Unicorn Baby Shower Decorations:
I pride myself on being just a little extra when it comes to party planning. Ok, so that’s a lie. I pride myself on being a lot extra.
So, when I knew I was going to be throwing a unicorn baby shower, I made more than just little decorations. I went full-on and made a whole set with a diaper cake, invitations and everything
You can find each of the coordinated unicorn shower items for these free printable baby shower decorations below:
- Printable Unicorn Shower Invitations (adorable way to start the unicorn-fun)
- Easy Unicorn Diaper Cake DIY Instructions
- Unicorn Baby Shower Games (no diaper raffle tickets, but some good ones)

More Unicorn Baby Shower Ideas
- Unicorn Baby Shower Treats & Eats
- All the Best Unicorn Baby Shower Ideas
- Turn your Shower into a Sprinkle
Unicorn Baby Shower Food Ideas:
- Unicorn Baby Shower Food Ideas – If you are having a unicorn baby shower, you need all of these fun themed foods.
- Pink non-alcoholic drink recipes – Over 20 recipes for pink colored, non-alcoholic drinks for your party.
- Pink Desserts – these 22+ pink colored desserts are sure to help you in your baby shower food planning!


Unicorn Baby Shower Decorations
This is such a sweet set of decorations for a baby shower. Plus, these unicorn baby shower decorations are just so easy to put together, it's crazy not to!
Materials
- 4 Sheets White Card Stock Paper
- Small Amount of Twine or Ribbon
- Large Banner PNG File
- Small Banner PNG File
- Large Circles PNG File (for use as cupcake toppers or other)
- Table Scatter PNG File
Tools
- Cricut Explore Air 2 or Cricut Maker
- Scissors
- Hot Glue Gun & Glue
- Desktop Printer
- Light Grip Mat
Instructions
- Working with one sheet at a time, download the PNG Files, then upload each to Cricut Design Space.
- Select "complex" image type. On the next screen, select "continue" and the following screen, select "save as a print and cut project".
- Insert the image onto the next screen, then select "make it".
- Load the white card stock into your printer and print the project.
- Place the printed card stock paper onto your light grip mat as shown on the screen in Cricut Design Space.
- Select medium-thickness card stock as the material.
- Load the light grip mat into your Cricut cutting machine and tell it to cut.
- When the cut is complete, weed the design and repeat with the remaining sheets of the decorations.
- When you have cut the banners, lay them out on the table face-down in approximately the position you want them to be on the twine or ribbon.
- Hot glue your twine or ribbon in place on the back of the banner pieces.
- Start decorating!

